A crimper (also called crimping pliers) is a specialized tool used to flatten and shape crimp beads — small metal beads that secure the ends of beading wire or thread. Unlike regular pliers, a good crimper has two different notches (grooves) in its jaws: one for folding the crimp into a rounded shape, and another for flattening it into a secure, professional finish.
In this guide, you will learn:
- The full meaning of each step in the crimping process
- How to use both notches of the crimper correctly
- How to attach calottes (clamshell knot covers) with crimps
- How to finish both ends of a beaded necklace or bracelet
- How to trim excess wire with cutters
Why Use a Crimper?
| Benefit | Explanation |
|---|---|
| Professional finish | Creates a neat, rounded crimp that fits inside calottes |
| Secure hold | Properly crimped beads will not slip or slide |
| Versatile | Works with beading wire, tiger tail, and soft flex wire |
| Dual-function tool | One tool has both shaping and flattening notches |
| Saves time | Much faster than tying knots |
Regular pliers vs. Crimper: Using ordinary flat-nose pliers to flatten a crimp bead creates a sharp, jagged shape that can cut through wire or catch on clothing. A crimper creates a smooth, folded, rounded crimp that is both secure and professional.
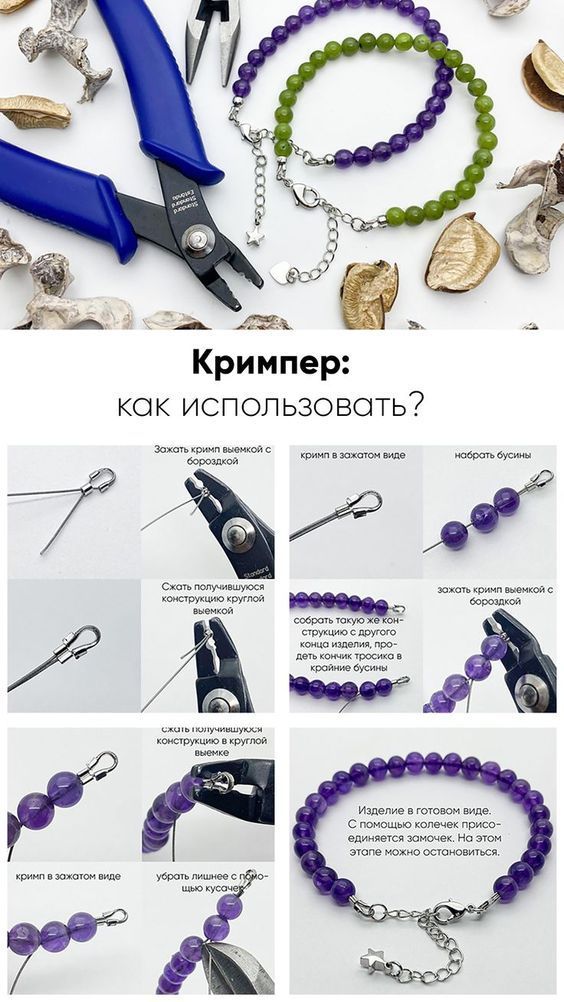
Part 1: Understanding the Crimper Tool
A standard crimping plier has two different notches (grooves) in its jaws:
| Notch | Shape | Use |
|---|---|---|
| Grooved notch (выемкой с бороздкой) | Has a small groove or channel | First step — folds the crimp into a rounded “U” or “O” shape |
| Round notch (круглой выемкой) | Smooth, rounded depression | Second step — flattens the folded crimp into a neat, compact cylinder |
Your image labels these as: “выемкой с бороздкой” (grooved notch) and “круглой выемкой” (round notch).
Why Two Steps?
| Step | Purpose |
|---|---|
| First (grooved notch) | Bends the crimp bead into a folded shape that grips the wire |
| Second (round notch) | Compresses the folded crimp into a smooth, rounded, professional finish |
Skipping either step results in a weak or ugly crimp.
Part 2: Step-by-Step Instructions (From Your Image)
Your image shows a complete workflow. Here is the expanded explanation.
Step 1: String Your Beads
| Action | Detail |
|---|---|
| Thread your beading wire or tiger tail | String all your design beads |
| Leave enough wire at both ends | Approximately 3–5 cm for finishing |
Result: A fully strung necklace or bracelet, with bare wire ends on both sides.
Step 2: Place a Crimp and Calotte on the Wire
| Action | Detail |
|---|---|
| Slide a crimp bead onto the wire | Followed by a calotte (clamshell) |
| The calotte is the small metal cup with two “ears” or halves | It will cover the crimp |
Result: The wire order is: wire end → crimp bead → calotte (open, facing away from beads).
Step 3: Pass the Wire Back Through the Calotte and Crimp
| Action | Detail |
|---|---|
| Fold the wire end back | Pass it back through the calotte and the crimp bead |
| This creates a double strand of wire inside the crimp | Much more secure than a single strand |
Result: A loop of wire at the end, with the crimp bead now containing two layers of wire.
Step 4: Position the Crimp Inside the Calotte
| Action | Detail |
|---|---|
| Slide the crimp bead so it sits inside the calotte’s cavity | The calotte will eventually close over it |
| Pull the wire gently to remove slack | The beads should sit snugly against the calotte |
Result: The crimp is positioned correctly inside the calotte.
Step 5: First Crimp — Use the Grooved Notch (выемкой с бороздкой)
| Action | Detail |
|---|---|
| Place the crimp bead into the grooved notch of the crimper | The groove faces the crimp |
| Squeeze firmly | The crimp will fold into a rounded “U” or “O” shape |
| The crimp now grips both wires | It should not slide |
Result: A folded, rounded crimp that securely holds the wire.
Step 6: Second Crimp — Use the Round Notch (круглой выемкой)
| Action | Detail |
|---|---|
| Place the folded crimp into the round notch | This is the smooth, rounded depression |
| Squeeze firmly again | The crimp will compress into a neat, smooth, cylindrical shape |
Result: A professional, compact crimp that fits perfectly inside the closed calotte.
Step 7: Close the Calotte
| Action | Detail |
|---|---|
| Fold the two halves of the calotte together | Use flat-nose pliers or your fingers |
| The crimp should be completely hidden inside | The calotte now looks like a small bead |
Result: A finished, professional end.
Step 8: Trim Excess Wire
| Action | Detail |
|---|---|
| Use wire cutters (кусачками) | Cut the excess wire close to the calotte |
| Do not leave sharp protrusions | The wire end should not poke out |
Result: A clean, safe finish.
Step 9: Repeat on the Other End
| Action | Detail |
|---|---|
| Assemble the same construction on the other end of the bracelet | Crimp, calotte, double wire, crimp, close, trim |
| Pass the wire tip through the last few beads if needed | To hide the end |
Result: Both ends are finished identically.
Step 10: Attach the Clasp
| Action | Detail |
|---|---|
| Use small jump rings (колечки) | Attach to the loop of the calotte (the small ring at the back) |
| Attach your clasp (lobster clasp, toggle, or magnetic) | To one end |
| Attach a jump ring or extension chain to the other end | For the clasp to hook into |
Result: A completely finished necklace or bracelet.
Part 3: Visual Summary of the Two Crimper Notches
| Notch | Shape | When to Use | Result |
|---|---|---|---|
| Grooved notch | Has a small channel / groove | First step | Folds the crimp into a rounded “U” |
| Round notch | Smooth, curved depression | Second step | Compresses the folded crimp into a smooth cylinder |
Common Mistake
| Mistake | Result |
|---|---|
| Using only the round notch | Crimp is flattened but not folded — weak grip |
| Using only the grooved notch | Crimp is folded but not compressed — bulky, may not fit in calotte |
| Using regular pliers | Crimp becomes sharp, jagged, and unsightly |
Part 4: Complete Materials List
| Material | Purpose |
|---|---|
| Crimper (crimping pliers) | The tool for folding and compressing crimps |
| Crimp beads | Small metal beads that secure the wire |
| Calottes (clamshells) | Decorative covers that hide the crimp |
| Beading wire (cable / tiger tail) | The stringing material |
| Beads | Your design elements |
| Jump rings | Connect calottes to the clasp |
| Clasp (lobster, toggle, magnetic) | The closure |
| Wire cutters (nippers) | Trim excess wire |
| Flat-nose pliers (optional) | Close calottes |
Part 5: Common Mistakes & Fixes
| Mistake | Cause | Fix |
|---|---|---|
| Crimp is sharp and jagged | Used regular pliers instead of a crimper | Always use a proper crimping tool |
| Crimp is flat but not secure | Used only the round notch | Start with the grooved notch first |
| Crimp is folded but bulky | Used only the grooved notch | Finish with the round notch |
| Wire slips through crimp | Only one strand inside crimp | Fold wire back for double strand |
| Calotte won’t close | Crimp too large or positioned wrong | Use smaller crimp beads; seat crimp inside cavity |
| Wire breaks at crimp | Sharp edge on crimp or wire fatigue | Use higher quality crimps; avoid over-crimping |
Part 6: Different Crimper Types
| Type | Description | Best For |
|---|---|---|
| Standard crimper | Two notches (grooved + round) | Most beading wire (0.3–0.8mm) |
| Micro crimper | Smaller notches | Fine wire, small crimps (size 1 or 2) |
| Mighty crimper | Larger, more robust | Heavy-gauge wire, large crimps |
| Combination pliers | Crimper + cutter + flat nose | All-in-one travel tool |
SEO Blog Post Optimization
| Meta Tag | Suggested Content |
|---|---|
| Title | How to Use a Crimper (Crimping Pliers): Complete Guide for Beaded Jewelry |
| Meta Description | Learn to use a crimper (crimping pliers) with grooved and round notches. Step-by-step guide for crimp beads, calottes, and finishing beaded necklaces and bracelets. |
| URL slug | /how-to-use-crimper |
| Keywords | crimper, crimping pliers, how to use crimper, crimp beads, calottes, beading wire, finishing beaded jewelry |
| Alt text for image | Step-by-step crimper guide showing grooved notch to fold crimp, round notch to compress crimp, calotte placement, wire folding, trimming excess, and finished jewelry |
Final Pro Tip: Practice on Scrap Wire
Before working on your finished jewelry piece, practice the two-step crimping process on a scrap piece of beading wire with a spare crimp bead and calotte:
- Thread the scrap wire
- Add a crimp and calotte
- Practice the grooved notch (fold)
- Practice the round notch (compress)
- Close the calotte
- Check the result — it should be smooth, rounded, and secure
One or two practice attempts will save you from ruining a finished design.
Summary: You Can Now Use a Crimper Correctly
| Step | Tool Notch | Action | Result |
|---|---|---|---|
| 1 | — | String beads, add crimp and calotte | Wire ready |
| 2 | — | Fold wire back through crimp and calotte | Double strand |
| 3 | Grooved notch | First crimp: fold into rounded shape | Crimp grips wire |
| 4 | Round notch | Second crimp: compress smooth | Professional finish |
| 5 | — | Close calotte, trim excess | Hidden, secure |
| 6 | — | Add jump rings and clasp | Finished jewelry |
A proper crimper and correct technique are the secrets to professional-looking, long-lasting beaded jewelry that will not fall apart.


